Pages

Thursday, June 10

Catching up: Spring review of artichokes, ladybugs, and alien purple flowers

Last year I tried growing some bare root artichoke plants that I got from the Natural Gardener. Although the plants sprouted, they never got very big and died as soon as the heat hit in May. This year I tried again, but planted transplants instead of bare root subjects. Now, perhaps I also paid more attention to them, watering and fertilizing more regularly, or perhaps it was just the breed of plant, but this spring, my two artichoke plants really took off.


(ps that's a baby dill plant in the far, upper left.  More on that guy later)
Though I got the transplants at the same time from the same nursery, the one on the left decided to grow tall and the one of the right decided to grow short. The above picture shows them young and happy.  I found out later that artichoke plants can get pretty ratty as they grow, and require pruning to remove dead/dying leaves  that the roly-polys love to chomp on.

And you know what other bugs love artichoke plants? Aphids!


I sprayed some neem oil on the plants, but by the time I saw these buggers, I thought for sure the infestation would win.  But then I saw a new form of foe.


Ugh! I felt like the worse gardener ever! I was totally powerless to help my plant.  But then, I put aside my panic and did a little research.  Turns out, these guys are 2 different forms of developing ladybugs.


(Sorry. That's the best shot I have of one.)  So the ladybugs had come to munch all the aphids.  Yay! The system works!  Really.  After less then a week I never saw any more aphids on the plants.  I was amazed b/c watching the ladybugs, I never actually saw them eat anything.  In fact aphids would just walk right up to a ladybug and then walk away unscathed.  Well, at least as far as I could see.  Apparently, they were way scathed when I wasn't looking.

And then came the first hints of artichoke.


I was totally stoked. And come to find that a plant can produce more than one artichoke at a time.

In my case, the secondary artichokes were never as big as the first one. Plus, the first one wasn't that big, but it was tasty.
Dan and I had to do some research about how to prepare and eat them (read: Alton Brown cookbook from Christmas) but it was a fun experiment.

Because of the smallish size of the artichokes we were picking, we thought we'd wait longer to see if they would get bigger.  In this case, the just started to flower.  But that's okay too.  As artichoke eating by nature involves a lot of butter eating and it was probably time for us to cut back on that for the spring.  Here's a photo sequence of the flowering:


Overall we got three purple flowers, but the heat is really taking a toll on the plants.  Most of the leaves are yellow and shriveled and the flowers look like someone singed them with a lighter.  I don't know if the plants will survive until next year (it's not likely in texas) but if not, I'll be looking for transplants to grow in 2011. And this time I think I'll give them more room to grow.  They start small but become very big additions to the garden.

Wednesday, June 9

Experiments in Potatoes

I bought some frou-frou potatoes a couple months ago. The kind that come in the special burlap bag so that the spuds are fooled into thinking they've never left the ground. These were platinum-members-only potatoes. So I couldn't be surprised when they began to sprout before I had a chance to use them.
But instead of being annoyed at my wasteful spending and inefficient meal-planning, I decided to try to grow them.  I don't have room in the garden for the type of mounding that's recommended, but in my research I ran across the concept of potato grow bags. Unfortunately, I didn't take pictures from the very beginning, but here's a shot from a couple weeks ago:
 
I started out with 2 inches of dirt and laid the cut-up sprouted potatoes on top.  Then, as the plants grew a couple inches, I mounded more dirt on them until the plant was barely showing.  The bag pretty quickly filled up. And the picture this morning looks like this:
 
(Hand is for scale and to show-off a new OPI color I found)
I think now I need to wait until the flowers die off before opening the velcro flap on the backside of the bag and checking for my bounty.  The plants look pretty happy, but who knows what's happening in the dirt?  More to come....

Sunday, February 14

First try at pressure canning

So I bought a pressure canner last Fall but hadn't had the gumption to use it until this past weekend.  I had cooked a stewing chicken bought from a local farm and decided to make and can some chicken broth.  The flavor for the broth was loosely based off of a recipe by Hutson's Herb Garden cookbook (she's the author that introduced 'salad burnet' to our gin & tonic repertoire.)

The broth isn't the most perfect broth/stock I've ever had, but it's good enough to flavor rice cooking anyway.  The big leap of confidence came in canning the stock. First, the canner had to come out of the box.
Nice and shiny, isn't it? : )

So the next step is to take the broth that had been simmering with herbs and onions for about an hour and a half and strain it.  (That 's how it ended up in the glass bowl. )  Then, after cleaning the pint jars and resting them in hot water, we ladelled the broth into the canning jars, leaving about an inch of head space.

We were able to fill about 8 pints, but there was only room for 7 in the canner.  (The other went straight to the fridge.)
We filled the canner with 3 inches of water before putting in the jars, but then felt like the canner was too full. So we scooped some out so that the jars weren't completely covered.

Then we shut the canner and started it up.  I don't have any pictures of this process, because I was too nervous with that thing hissing and spitting on the stovetop to get the camera.  Dan took a video of it for a little bit, but I was too busy being crabby and worrying.  You see, this canner was different than the canner that I had seen in my canning class.  And it wasn't doing the thing I was sure (through word of mouth and reading) that a canner was supposed to do. It wasn't making a soothing 'rocking' or clicking sound.  The pressure weight was spinning furiously at first and then barely moving if we turned down heat.

Dan thought it pretty funny a the time.  I think it's funny now, but I couldn't see the humor then. That's a shame, 'cause having a live tiger spitting at you from your stove top is pretty dang funny.

But moving on.  We lasted through 20 tense minutes and then cut the heat. We let the canner cool for about 40 minutes until the safety lock allowed us to open the lid.  We move the jars to a wooden cutting board to cool.

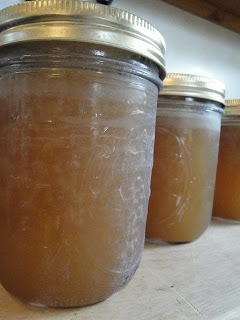
The jars continued to boil for a while.  (Being under 10 psi for 20 minutes made the contents pretty hot.) I also noticed that the all the jars had a residue of some kind of salt/lime.  Probably because the water here in central Texas is a little on the hard side. Next time, I'll put a little vinegar in the canning water to see if that cuts this down some.

All the seals took and I now have 7 pints of broth in the pantry.  We made fish soup last night with the straight-to-refrigerator pint and it tasted alright, so I have hopes that these seven pints will be useful. I deemed this canning escapade a success. But let me also say, I understand why broth in the store is packaged in opaque boxes or cans.  Broth is not pretty in a jar.  But it's a useful pantry staple and it feels good to have made some from local fixings.